
Important Aspects of Mixing
Michelle Sabolchick Pettinato suggests the following fundamentals of mixing:
- Great sound starts at the source
- Choose the right mic and find the best placement for it
- Set up good gain structure
- Use basic EQ, minimal gates and compressions.
Paul White has an excellent article on Mixing Essentials. The guidelines at the section Mixing EQ Cookbook are very helpful. (He also has a series of videos on fundamentals which I think are terrible to listen to.)
Mixing encompasses a number of inter-related skills. Each one is important, but knowing when and how to use each one requires technical knowledge and experience. A few of the most important skills are mentioned here.
If one had to state the most important skill in mixing, it would have to be listening. This in turn requires that you have excellent hearing, and if you are older than 40 or have had significant exposure to loud sounds, you need to get a professional hearing test. While this may not require that you wear a hearing aid, it will inform you about the frequencies where your hearing has deteriorated so that you lessen the possibility of mistakes in applying the other skills listed below. One way to get a free hearing test is to respond to a hearing aid offer or perhaps visit a hearing aid store. There are some free apps that may be helpful, but they are no substitute for a real hearing test.
I personally feel that most people under the age of 30 probably have some degree of hearing loss due to the loud music they listen to in their earbuds. If this fits your experience, you should consider a hearing test. As an operator, if you set the sound level as you like it but your audience says its too loud or too bright, you could have some hearing loss.
Once you know your hearing ability, or even if you don't, it is important tp protect your hearing organ - the ear. Avoid loud sounds, particularly those of long endurance. Wear ear protectors in situations when it is not important that you hear sound nuances, such as at a sports venue, a rock concert, or even your local bar.
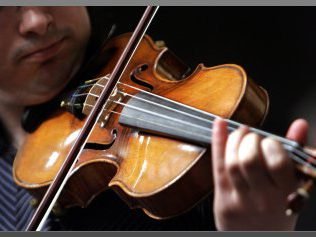
The only way to know how things sound is to listen to stuff. This can help with hearing loss, because you know what the source sounds like in your ears. You should know how various instruments sound live, how a symphony orchestra sounds, how a good band with various instruments sound. Pay attention to how one or more instruments blend to create different overtones. It is particularly important to listen carefully to live piano sound. This instrument is widely used, and it has clear tones over a fairly wide frequency range. You need to know when a recorded or amplified piano sound is distorted, and it is helpful to know how an electronic keyboard compares to a real piano. Another instrument to pay attention to is the violin, which has excellent high-frequency response and subtle overtones. If you are amplifying or recording a violin, you need to know if you are producing its sound accurately. This also applies to an acoustic guitar. You need to know the nuances of the sound from an acoustic guitar.
You also need to develop the ability to determine the frequency of sounds you are hearing. The only way to do this is with some form of sine wave generator. This may be an app on your phone, a computer application, or a generator connected to a sound system. You should also be able to detect when a pure sine wave is distorted in some way. This often happens when a sound level exceeds the input level that a device or circuit can handle. You must be able to detect immediately when this is happening. This can be difficult when lots of frequencies are generated simultaneously from a source. When you hear distortion in your final mix, you need to be able to determine what device is causing it, and the frequency at which it is occurring is an important clue.
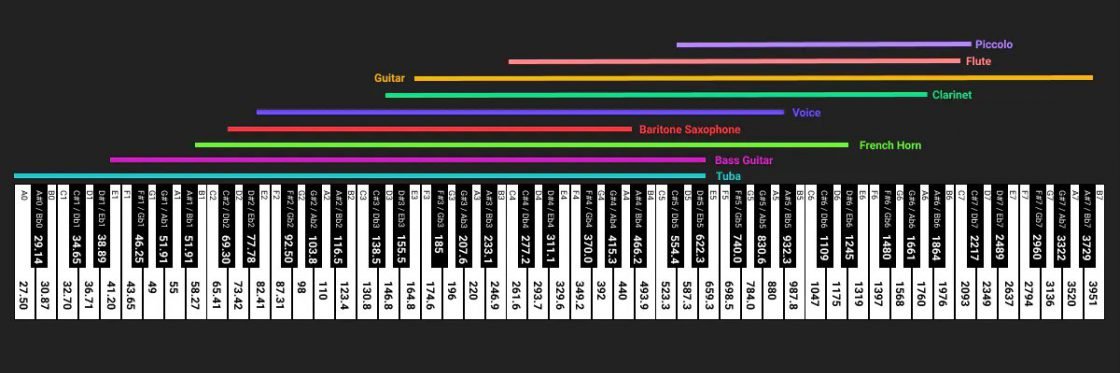
Check out this picture that show the frequencies of various piano notes and the frequency ranges of various sources.
It follows that you need to know how a good vocalist should sound. You should be able to detect when certain frequencies can be a problem with a particular person's voice. While the nasal sound of a tenor may be desirable, for a baritone it is probably less so. Some female voices can have a harsh high-frequency content. The only way to know what a good vocal sound should be like is to listen to good vocalists. In the end, this determination is very subjective. If you are working with a vocalist, be sure they are comfortable with your settings on their channel. Use proper devices to eliminate breath noises and plosives. Correcting these issues requires a sensitivity to these factors, knowing the frequencies where they are occurring, and what to do about it.
- Here is another way to learn frequencies.
- Mixing Monster has a very complete article on developing listening skills.
- Ear Training for audio engineers - a nice treatise on the topic
- Isotope,com has an excellent page on Ear Training Exercises
- Michelle Sabolchick has a professional course on Listening.
While I have emphasized learning sound at various frequencies, the above detailed articles also cover listening to other things that affect sound, such as compression, distortion, and various artifacts.
PFL/PAFL Switch
An important tool on every mixer is the Solo or PFL (Pre Fader Listen) switch. There is usually a button for each channel and each mix bus. This lets you hear the sound prior to the fader so you know the characteristics of the sound being sent to each channel or bus. Some mixers let you switch this to AFL to hear the sound after the fader, so the button may be labelled PAFL. Be sure you know whether the Mute buttons on your mixer mute the signal prior to or after the PFL bus. The mixer typically will route the PFL or Solo signal to both a Phones output and a Monitor bus. The latter can be used for monitor speakers in a control room environment. In fact, that bus may be labelled Control. For live performances, you want a set of good isolating (NOT noise cancelling) headphones. A picture to the right shows four pro-level headphones that sell for under $200 that can be used for signal monitoring.
LISTENING TIPS
Using an RTA
A good way to learn to recognize frequencies is to use an RTA - a Real Time Analyzer. This device shows the levels of various frequencies in the sound being picked up by a microphone or played on the device where the RTA app is installed.
You need an RTA with at least 30 bands over the frequency range of 20 Hz to about 18 kHz. This gives 3 band per octave, the doubling of a frequency, You should be able to find a free one for your phone or PC. You may have to buy one to get more than 30 bands. Most digital mixers have one built in.
One way to learn to recognize frequencies is to use an RTA app on your phone with a piano. As you play notes on the piano, the RTA will identify the frequency of each note. Another way is to watch the RTA as various instruments are played, either live or through a good high-fidelity sound system.
Listen using your mixer PEQ
On a digital mixer or DAW you can use the PEQ display to learn frequencies.
- Play some wide-range music or pink noise, Select one of the frequency bands,
- Set the Q as narrow as possible,
- Increase the band level to +10 dB, and
- Sweep the curve over the frequency range while observing the frequency.
This will let you hear frequencies in that band and how it affects the sound. You can also make a cut in level and see how that affetcs the sound at various frequencues.

The only way to know how an amplified or recorded instrument should sound is to spend time listening to the real instrument.

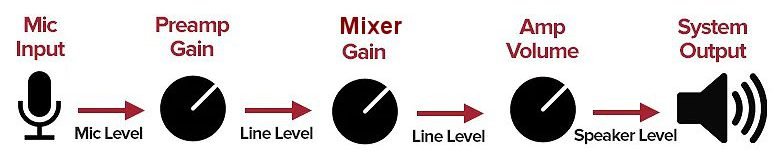
Perhaps the most critical setting on a mixer is the Preamp Gain. This control is also referred to as Trim. This is typically the first setting one makes when setting up a mixer or adding a new source. It is very important on an analog mixer, as it determines the initial Signal-to-Noise ratio (S/N) for that channel. Most mixers have an LED that lights when the level is too high and the signal is clipped. You want to set the level so that this light seldom or never clips. You also want the channel fader to be at or close to 0 dB most of the time, so the Trim is usually set with the fader at that point and the trim is advanced so that the channel meter reads approximately 0 dB, but leave yourself some headroom, especially is the source is very dynamic. If this situation can not be obtained, or if there is inadequate metering on the mixer, you must use judgement regarding these two settings. You want to keep signal levels "out of the red." Here is a video on setting the trim on an analog mixer.
It is also important on a digital mixer because if it drives the first stage into overload, the distortion is very bad. Because digital mixers have such a low noise floor. maximizing the initial level is not quite as significant as with an analog device, and often this gain is set so that subsequent fader control can be set close to 0 dB and the signal level is around -10 to -18 Full Scale (FS). Digital mixers almost always have good metering to help make these adjustments. in 2021, Joe Gilder published a brief article that emphasized how to take advantage of the large dynamic range of the digital domain. He also has a video on this topic,
At a minimum, the trim control should be set so that you have optimal headroom for each source. Headroom is the difference between the average level of the source and the maximum that can be tolerated without distortion. Additional information is in the Tutorials section below.
Here is a video on Gain Staging on a Digital Mixer. (Same as to the right,)
A very detailed presentation on Gain Staging is one by Julian Krause.
An excellent discussion of three ways to set gain levels is one by Chris Huff.
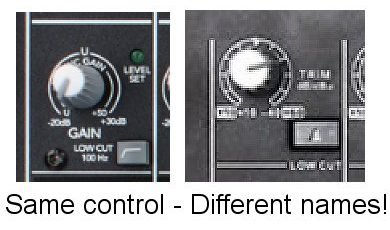
I should perhaps note that some operators like to differentiate between Gain and Trim. Some professional analog mixers have both a Gain control and a Trim control. The Gain control is then typically a switch that changes the gain in steps, and the Trim is used to make finer adjustments between settings on the Gain control. Most mixers have only one control, and it may be labelled Trim or Gain. The picture at the right shows the Gain control on an American mixer made in China vs the same mixer under an Asian logo. The QSC Touchmix digital mixers have an analog Trim control that sets the preamp signal level and a Digital Gain control that is used to set the signal level after the conversion to digital. Go figure!

Equalization is the process where sound is sculpted electronically so that the sounds at various frequencies are either all the same volume (a flat response) or meet some other artistic goal. EQ is the electronic equivalent of volume knobs at various frequencies. This is one of the most useful tools of an audio tech, if used properly.
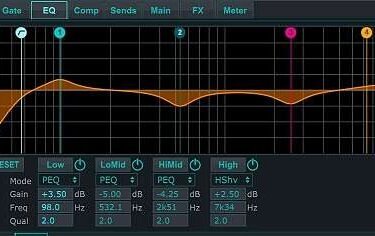
Each EQ control is some type of filter. The figure to the right shows the 4 basic filter types as they are displayed on a mixer LED screen. The parameters of each type can be adjusted - the frequency at which the filter is designed to function, The width or sharpness (Q) of the filter, and the gain that can be adjusted as needed to compensate for the effect of the filter on the signal level. Go here for more details on filters.
The next figure shows the parameters used to describe a particular filter. The bandwidth may be described as the width at 3 dB down from the maximum or using the Quality factor Q:

Here f is the center frequency and delta-f is the width at half amplitude. -6 dB. Most digital mixers have fully-parametric filters which allow one to set the Q value for each band, and there typically are 4 bands that can be used, as shown above
When tuning a room, the goal is to make the sound reasonably
flat, so that what is heard in the room is as close as possible to the original signal. Typically, this means reducing frequencies where either the room or the speakers have resonances or peaks in their response curves. Care must be exercised in boosting frequencies, as this can lead to feedback, (See below.)
However, EQ can also be used to produce a particular type of sound, such as the booming bass of rock or rap, or it can be used to correct certain deficiencies in the speakers, such as a lack or bass or treble response. Just like any tool, however, this one can be abused.
An RTA is very helpful in identifying the frequencies where adjustments are needed, but many experienced techs prefer to use their trained ears. I recommend the use of both of these tools. A good RTA will show you in very narrow bands where peaks occur in the frequency spectrum as well as where feedback or resonances occur . Your ear may not be able to distinguish between a 1 kHz and a 1.2 kHz squeal, but a narrow-band EQ can, and this can be critical in correcting feedback. Figure 1 shows the RTA display on an A&H QU32 mixer. The RTA can display the response of any channel or mix and can also be displayed when the EQ or GEQ panel is being displayed. The loudest frequency is displayed at any instant in red on this meter.
Note: Many tutorial videos use a DAW to demonstrate EQ settings. This is because of the display curves available in this format. Most of the principles will apply even on an analog mixer.
The top video to the right shows one person's approach to EQ'ing vocals. This is somewhat subjective, but you'll get the idea. This is where critical listening comes in. One technique that can be helpful for determining the frequency where adjustment is to dial in a boost of 6 to 10 db and sweep this through the frequency spectrum. The places where the sound seems harsh is where you want to cut. The next video uses this technique.
The second video is very helpful for showing the effect of EQ on vocal sounds. This one uses a DAW, which makes it possible to demonstrate the effects of the adjustments. Note particularly his recommendation regarding the high-pass filter. He also shows how one might deal with room resonances, but on a mixer there are not as many filters available, so judicious choices must be made.
The third video discusses EQ in general, using a Harrison MixBus DAW. While peculiar to this particular DAW, the information presented is widely useful. He discusses "carving out" space for various instruments in a mix.
Three common steps to adjusting EQ are these:
1 - Balance the frequencies
Generally, any particular frequency or region should not predominate in the mix. Of course. each instrument may have predominant frequencies, and when that instrument is heard alone, those frequencies will stand out. Once the instrument becomes part of a mix, it should not be overly predominant.
2 - Know the 5 primary frequency ranges
This is somewhat subjective, but one suggestion is 50 Hz, 100 Hz, 5oo Hz, 1000 Hz, and 10 kHz. Learn how each of these bands contribute to the mix and make adjustments accordingly.
3 - Use EQ cuts primarily
Boosting frequencies can lead to feedback in live situations or can lead to harsh sounds in recordings. It is better to remove those frequencies where there are problems with the sound.
Sometimes, an audience such as a worship congregation, will say that the sound is too loud. That may be the case, but if sound levels are maintained below 85 to 90 dB, the problem may be to inadequate attention to EQ. If no effort is made to adjust EQ so that each instrument and the vocals are able to be heard properly, then everything contributes to the entire sound envelope, making the overall volume louder.
EQ is very subjective. It is somewhat dependent on the operator's hearing ability and listening skills as well as his/her personal sound preferences. The best approach is to know how things should sound and strive to make the mix sound as natural as possible. The ability to achieve that and exactly how it is done is somewhat dependent on the capabilities of the mixer and the room acoustics. See Additional Resources to the right for some of the details and Tutorials below for more information.


Figure 1 - A Mixer RTA Display


A very helpful tool for minimizing undesired volume excursions or for making the volume envelope smaller so that the overall level can be increased is Dynamic Range Compression, usually just referred to as Compression.
Audio Compression Basics - Universal Audio has an excellent article by Mason Hicks on compression. Here is a summary from his tips page:
- Apply “gentle” compression at different stages throughout the recording/mixing/mastering process, rather than applying excessive compression at just one point.
- Always listen carefully while adding compression. Compression can negatively affect the timbre of an instrument.
- Try starting with a moderate to medium ratio of between 2:1 and 5:1. Set your attack time to a medium-fast setting and your release time to a medium setting.
- Then set your output gain to compensate for the attenuation caused by the compression.
- Finally, speed up your attack time gradually until it gets noticeable and then back it off slightly.
- If you’re going to compress an entire mix, use caution. A multi-band compressor may be needed here. These typically require a DAW.
As always, let your ears be the final judge. If it sounds good, it is good, assuming you know how to listen!
Check out this tip from Joe Gilder.
Joe Gilder has an excellent video on Compression - 6 Rules of Compression
Wikipedia has a good article on Dynamic Range Compression.
When you add a compressor to a track, does the track get louder? If so, you might be hurting your mix.
Every time I mix, my first priority is to set levels for everything, to get a great-sounding static mix with no plugins. THEN I reach for things like EQ and compression. If I add a compressor to the kick drum, and I crank the output of the compressor and make the kick much louder, what have I done? I’ve messed up my balance. I now need to add more volume to other tracks like snare drum and bass guitar and vocals to get them loud enough to compete with the new kick drum level. Next thing I know, the mix bus is clipping and the mix sounds wonky. Here’s what I want you to try instead. First, spend a good 10-30 minutes setting levels for your mix. Only adjust volume and panning. This is the foundation of your mix. If you rush through building the foundation of your house, the entire structure will be in danger of falling apart. Treat your static mix the same way. Set the balances, then go in with plugins to fix problems.
Next, every time you add a plugin, make sure that the before/after volume is the same. If I add a compressor to my kick drum, I’ll dial in a great, snappy, punchy tone, but THEN I’ll hit the bypass button to make sure I didn’t add too much volume. If I did, I adjust the output volume of that compressor. I want the kick to be roughly the same volume with and without the compressor. The tone will change, but the volume doesn’t need to. That’s how you maintain the integrity of your mix. That’s how you keep things in balance. That’s how you avoid undoing all your hard work in the static mix. It will feel weird at first, but I promise it works.
Compression Ratio Values
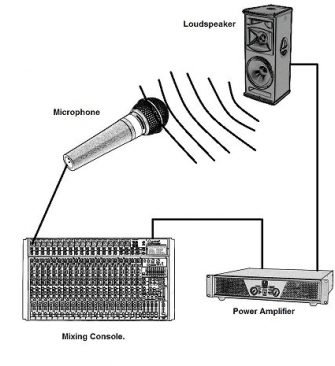
A common problem when amplifying sound in a room or other venue is the phenomenon called feedback. This happens when the sound from the speakers or room reflections impinges on a microphone and is amplified again. If not corrected, feedback will escalate to the point where the amp shuts down or the speaker is damaged. Some mixers or DSPs have automatic feedback eliminators that can help, but often it is the operator who must correct the problem.
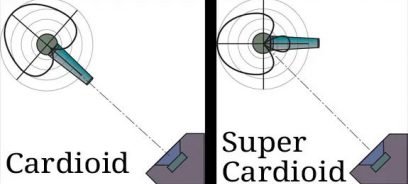
If possible, a sound system should be set up knowing the directivity of speakers and microphones and placing each of these accordingly, to minimize the radiation of sound directly toward the mics. The mics should be used as close to the source as possible. with the minimum lobes of their polar pattern directed toward the speakers. Knowing the frequency response of the speakers and mics in use will also help to know how to set EQ to minimize feedback. This is especially important with stage monitors, It is also important to minimize or remove the vocals from stage monitors, but that may depend on the preferences of the vocalists and their ability to hear the music. It may be dependent on the skill of the mixer operator and the trust the performers have in that person.
For example, if a pulpit or rostrum mic is in use, it is probably a condenser, since these work better than dynamics at longer distances. They also are more prone to feedback. If that is the problem, replace the mic with a dynamic on a boom that can be closer to the person speaking, or suggest that the speaker use a handheld. If possible, use a lavalier, which can be placed closer to the mouth of the presenter. Better still, use a head-worn or ear-worn mic, which gets the element even closer to the mouth. Either of these can be omni-directional or cardioid, but if high gain is needed, the cardioid may be a better choice. Just be sure the mic is properly positioned to point toward the mouth of the presenter.
It is also important to use a few mics as possible, as the gain before feedback is reduced 6 dB as the number of mics are doubled. Turn on only the mics that are needed at a given time, if several are present.
The next control choice is EQ. Feedback is generally occurs at very narrow frequency bands. Your listening skills may allow you to know the frequencies when they occur, but usually a device such as an RTA is most helpful. These may be on a digital mixer on a smartphone. The RTA usually shows the predominant frequency at any given time. The figure to the right shows the RTA display on an A&H QU32 digital mixer. Note that the highest level frequency at the moment is shown in red. When feedback occurs, those frequencies will tend to become the loudest. The goal is to reduce the gain at the three or four predominant feedback frequencies. Once that is done, if the feedback persists, you must reduce system gain or change the environment.
3 Secrets to Eliminating Microphone Feedback (Sweetwater- 09/2023)

It is important to pay attention to the overall sound level in the venue when you are mixing. For a worship service this is critical. While some churches will blast you out with sound, the people present usually are not worshipping, they are just enjoying the performance. In a bar where participants are somewhat inebriated, the sound levels can get quite loud, and one has to shout in order to be heard a foot away. Perhaps that is why the sound is so loud - things are being communicated that others should not hear. It takes a few minutes after you leave before your ears stop ringing. The band has to play loud to even be heard above the din of shouting people.
Enough of my opinions on loud music. You get the idea. As an audio tech, you need to set sound levels that are commensurate with the purpose of the music or speech for the gathering. A typical sound level in a relatively loud room should not be higher than 85-90 dB at the peaks. The average level should be lower, more like 60-70 dB when singing. However, the sound levels of music should not be so low that it looses its vibrancy and feel. Bass frequencies must be fairly loud to be heard. It should not sound like you're listening to a table radio.
There are several good smartphone apps for measuring sound levels. This is perhaps the easiest way to monitor sound levels in a room or during a performance or worship service.
The Architectural Toolbox has a detailed technical discussion of sound levels. The Eastern Kentucky School of Music has an excellent page of sound levels, with some helpful charts. One guideline is Decibel levels exceeding 90 or more should be limited to no more than 2 to 3 hours per day. One of their charts is shown to the right. From these data, it no longer surprises me why musicians like loud music - they are partially deaf from hours of practice and performance at loud levels!

When one set of speakers is not enough
In a long room, or when the room architecture, such as a balcony, causes the sound level to be decreased significantly, another set of speakers is needed. Remember that the sound level decreases as the square of the distance from the source, that is 6 dB reduction for every doubling of distance. For example, if the front row is 10 feet from the front speaker, a listener 40 feet away will hear the sound at a level 12 dB lower. This suggests that a second set of speakers is needed to toward the rear to increase the SPL at such distances.
The other common cause of a significant difference on sound level is the presence of a balcony. Not only is distance from the front a factor, but the balcony structure itself can block some of the sound in the room.
If the difference between the sound from the rear speakers is greater than 1/30 second (33 milliseconds), the listener will hear two sounds - an echo. The corresponding distance is about 36 feet. For shorter distances, while the listener may not sense an echo, the front and rear wave fronts can interfere, resulting in a slight distortion of the sound, and the listener will sense that the sound is coming from a second source, destroying the image of the source being at the front.
In each of these cases. it may be necessary to install another set of speakers with a separate amplifier, because it is necessary to apply a delay to the sound source to account for the separation distance. Sound travels at approximately 1100 feet/second, so a listener 50 feet from the first set of speakers will hear that sound after 50/1100 = .0045 seconds or 4.5 milliseconds. It is helpful to note that 1/1100 = .0009 or 0.9, so to get the milliseconds of delay involved just multiply the distance by 0.9.
Often it requires smaller speakers for placement under a balcony, so several speakers may be needed. In this case, a "constant-voltage" or distributed speaker system may be needed. See the section on speakers for details about such a system.


A microphone is designed to pick up sound, but it is important that a mike be used properly so that the sound level is optimum, the mike is not overloaded, and there are no aberrations due to mouth and lip movements or air movement around the mike. It is important to know the properties of the mike in order to use it properly. One should know the polar pickup pattern of the mic (mike) in use as well as its proximity effect. You must keep in mind that the sound pressure at the microphone goes as the inverse square of the distance. If you double the distance from the source to the mic, the sound level goes down by a factor of 4. However, as you get within a foot or so of a directional mic, the proximity effect comes into play, increasing the lower frequency output. When more than one mic is used tp pick up the same source, phase issues may arise, and sound bleed from other sources can also be an issue. See below for more details.
Some operators recommend that a vocalist sing directly into a mike. I disagree with this - you are asking for trouble when you do this. One of the most popular mics used by performers is the SM58 and its siblings. Even a mic such as the SM58 exhibits plosives when used close-in and not used with a foam pop filter. While this particular mic, which has a somewhat lower output level than others, may not distort, many will if the vocalist gets too loud. In a loud venue, the plosives and breath noises may be obscured, or the mixer operator may be able to apply a high pass filter that will help control these noises, but that is not always possible. I usually recommend that a vocalist use a foam pop filter, hold the mic 2 to 6 inches away, and bring the mic in closer when the vocal output is low. The pop filter allows a performer to get very close while minimizing plosives,
Another technique is to put the microphone below the mouth. angled up toward the mouth or downward. For studio recording, downward is better, reducing nasal sound, but for live performance, some prefer an upward placement, as this gets the mic out of the person's face. This puts the vocal output in the cardioid pattern of the mic, but the breath front is directed away from the mic capsule itself. Even in a recording studio, this technique is often used, particularly if the vocalist is adverse to using a pop filter.
These opinions are very subjective, mine included. Consider all of them, but experiment yourself and make an informed decision when it come to microphone positioning. Just remember that many factors are at play here, so take all those factors into account as well. I have tried to give guidance that works for most situations. For example. it is important to remember that when a recording is made, if plosives occur, you can't remove them. Better to make sure they don't occur. In a live performance, If no pop filter is used, plosives will occur, but their sound may be obscured by the rest of the music, so they may be tolerable. I mention this at some length below.
To pick up a group of singers, it is helpful to get the mic up in the air to minimize the difference in distance from the mics of singers in the front and back rows, When two or more mics are used to pick up a source it is important to understand the 3-to-1 rule - two mics should be 3 feet apart for every 1 foot of distance from the source, This avoids phase cancellation artifacts in the sound mix.
Shure says: Strictly speaking, the 3-to-1 rule is based on the behavior of omnidirectional microphones. It can be relaxed slightly if unidirectional microphones are used and they are aimed appropriately, but should still be regarded as a basic rule of thumb for worst case situations.
George Peterson discusses these concepts. He uses a graphic that shows the 3-to-1 rule. Remember that the two mics in his graphic should be raised as shown in the graphic to the right.
Shure has an extensive article that covers most aspects of microphone use. They are a proponent of straight-on miking, believing that off-axis use may lose some high-frequency content. While that may be true for some instruments, it probably is not the case with vocals. Use your own judgement, and experiment when possible. The article discusses the 3-to-1 rule and is very helpful overall. Includes a mic selection guide.
I am a firm believer in using foam pop filters with a vocalist. The helps tremendously in minimizing, if not eliminating, plosives and breath wind noise. Some purists disagree with this, suggesting that these interfere with high frequencies, I have never found this to be the case. And guess what - if you take off the metal wind screen of just about any vocal mic, you will find a layer of foam material inside! The Shure SM58 is an example. If you listen carefully to a singer using an SM58, you'll almost certainly hear plosives, if they have a reasonable level out vocal output, even with the layer of foam inside the windscreen. That is one difference between the SM58 and the SM57, which is the go-to mic for picking up instruments. The SM57 has its grill very close to the capsule. If used for vocals, it will most certainly require a foam pop filter.


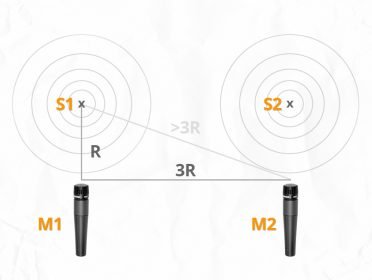
The 3-to-1 Rule Diagram
Check out this example of the miking technique used by Joe Gilder for his podcasts on HomeStudioCorner.com. He prefers to place an LDC mic off to the side of his mouth and at a reasonable distance so that no pop filter or screen is needed. He has a great voice, and it comes out clear with this technique. Here he is talking about Stereo vs Mono in recording,
Digital sound and music has an extended article on Sound for All Occasions that covers miking techniques.
Church Collective has a brief article that suggests how mics should be used in a worship setting.
Practical Music Production has a good treatment of microphone use in a recording studio environment. He demonstrates an interesting use of two mics for recording an acoustic guitar and discusses three ways to position two mics, emphasizing the importance of phase.
Joe Gilder has a somewhat extended video on the importance of avoiding the proximity effect when recording. A second video discusses four stereo techniques for recording.
Audio University also covers stereo microphone techniques. Humans are evolutionarily equipped with the ability to determine where sounds originate based on the following factors: Interaural Level Differences (ILDs), Interaural Timing Differences (ITDs), and Interaural Spectral Differences (also called Head Related Transfer Function, or HRTF). An excellent video is used to demonstrate these principles. Use earphones to listen to this video. An excellent guide to microphone techniques.
Sweetwater also has a brief article that covers stereo mic techniques. For example: Any time you have microphones covering the same sound source from different distances, you’re likely to run into some phase problems, as the offset in distance causes the sound to reach the microphones at different times. When in doubt, use your ears, reevaluate your mic placement, and make adjustments to get the results you want.
Björgvin Benediktsson has an excellent article on stereo microphone techniques and an entertaining video demonstrating and explaining the binaural stereo miking effect, Be sure to use headphones with this video - the Virtual Barbershop.
OpenMicUK has an article with two videos that cover microphone technique. The first video is rather difficult to listen to, and I don't necessarily agree with all of his advice. The second video by Julie Miles is much more listenable and gives some good advice.
It is not uncommon for an audio tech who may be designing or setting up a sound system to think how nice it would be to have stereo sound rather than mono. In a small venue, or in a home, stereo may work well, but in most venues were a PA or other sound system is used, stereo does not work well.
There are several reasons for this. First, let's be sure we understand the difference between mono and stereo. Mono refers to a single sound source - the same signal goes to all speakers. With stereo, the listener must hear a balanced sound from two sound sources. Each speaker in a stereo source normally has a small portion, with some timing and/or reverb differences, of the opposite speaker. The overall level of both sources should be similar at the listener's position to perceive a stereo image. In this case, a phantom center image is also created. Moreover, a stereo signal is usually intended to convey the acoustics of the source. A PA system works in a venue where acoustics plays a role in the sound perceived. It doesn't make much sense when one person is speaking or singing to have a stereo source. (Go to MCSquared for details.)
In a small venue, this equal level of sound from both sources may be achievable, at least for a large portion of the audience, but in most cases, members of the audience are significantly closer to one source, and that is the one they hear primarily. Thus, even if the two sources are intended to be stereo, many listeners hear only a mono signal or at best a limited stereo image. When there is a band or orchestra that generates its own sound, a bit of the center is filled in with sound, so a pseudo-stereo image may be achieved.
Another issue that arises with more than one loudspeaker is that if the listener perceives the same sound from two speakers, there are typically interferences or banding effects (comb filtering, hot spots) caused by the difference in phase from the two sources. It gets complicated trying to explain the degree to which this is a problem (e.g. timing difference >1 ms). For now, just assume it is a problem. Thus in most cases, system designers try to use directional speakers and aim them so that listeners get sound from only one source. This means that the signals must be mono.
"To achieve proper loudspeaker coverage to replicate a stereo image in a large venue, it is necessary to have a loudspeaker system for each channel that can provide uniform coverage of the entire listening area while maintaining the directional cues."
---- MCSquared
Today, systems are being installed to provide "ambient" sound, where the listener perceives sound from many directions. This is beyond the scope of this web site. I will provide a few resources where you can dig deeper into these arenas.
- MCSquared has a very good article on Mono Vs Stereo Sound. It has active images that show the coverage patters with various speaker arrangements.
- Sweetwater has an excellent article on Speaker Coverage.
- If you are interested, Wikipedia has a great article on Stereophonic Sound,
- Wikipedia has an interesting article on Ambisonic sources.
- AstralSound has a good article on horizontal speaker patterns.
- Acoustic Frontiers has an article on Speaker Directivity.
I am a firm believer in using foam pop filters with a vocalist. The helps tremendously in minimizing, if not eliminating, plosives and breath wind noise. Some purists disagree with this, suggesting that these interfere with high frequencies, I have never found this to be the case. And guess what - if you take off the metal wind screen of just about any vocal mic, you will find a layer of foam material inside! The Shure SM58 is an example. If you listen carefully to a singer using an SM58, you'll almost certainly hear plosives, if they have a reasonable level out vocal output, even with the layer of foam inside the windscreen. That is one difference between the SM58 and the SM57, which is the go-to mic for picking up instruments. The SM57 has its grill very close to the capsule. If used for vocals, it will most certainly require a foam pop filter.


Groups and Auxes
A large mixer allows the channels to be used as groups, and outputs can be directed to one or more outputs. The outputs other than the primary or Main are called Auxiliary Outputs, or Auxes. The video below is a basic introduction to this topic.

To see some examples of actual small to medium-size mixers, go to the Mixer Types page.