Audio Mixers

Note to audio gurus: I am well aware of professional high-level mixers costing $20,000 and up. This site is clearly not aimed at engineers who might use such devices. This site is aimed at the beginner or those with some basic experience who want to learn more about the technology behind their craft.

Note for Novices: The information on Mixers covers three pages and assumes you know the technical terms needed to understand their operation and functions. If you need a review of most terms, go to the Audio Concepts page.


Mixer Controls

Knowing how a mixer works is a critical skill for an audio engineer.

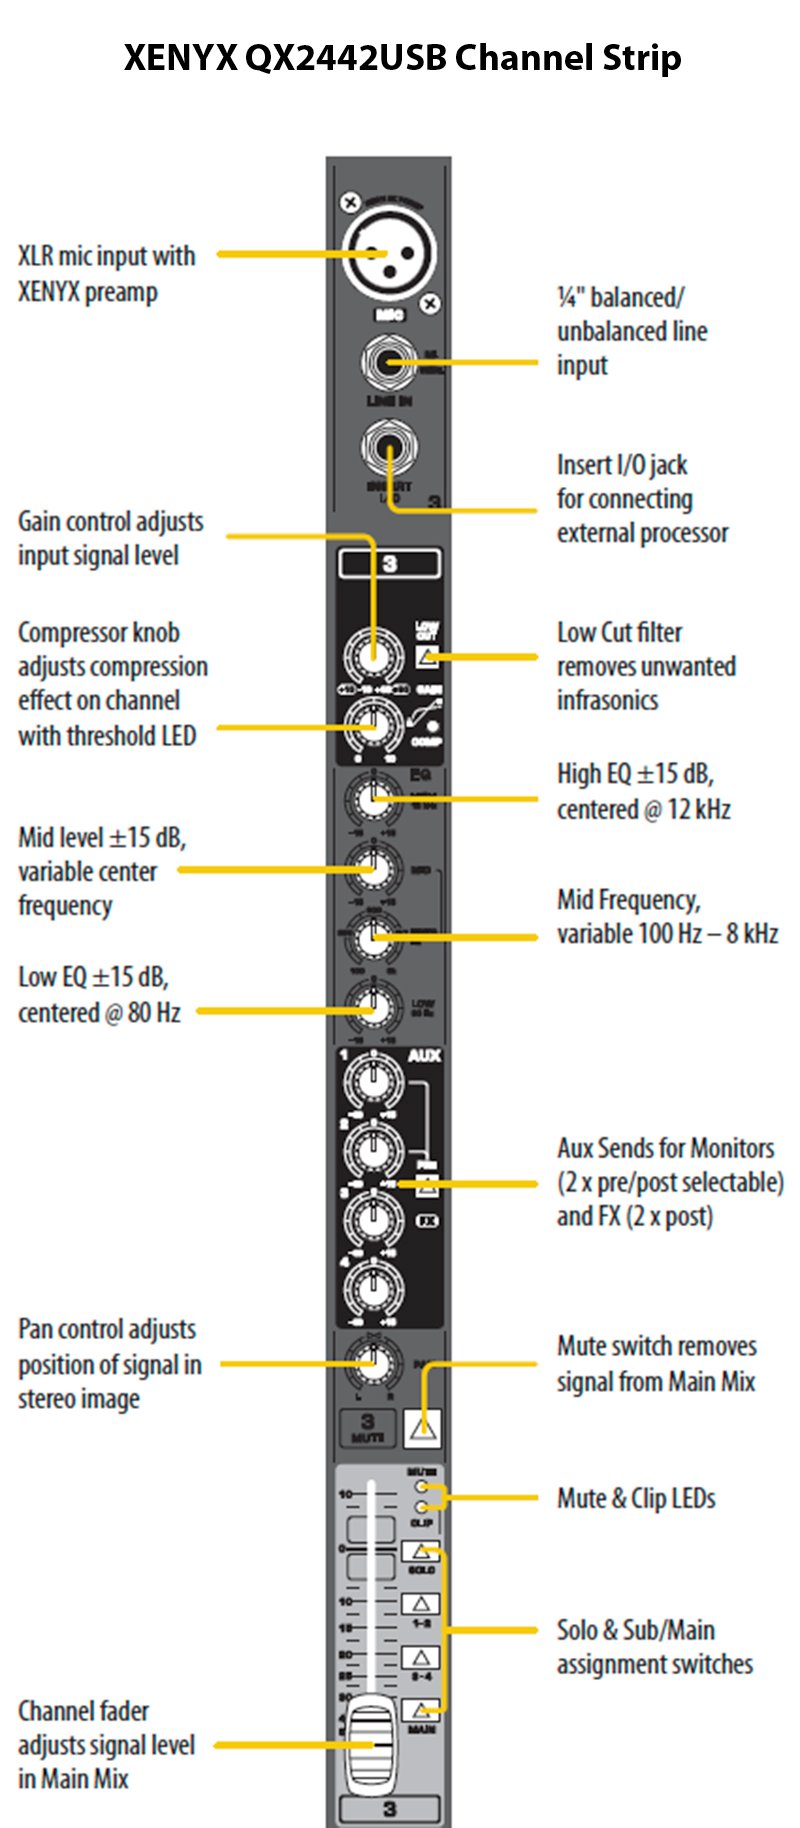
The diagram above shows the basic controls on most mixers,

and the video below is a very basic introduction to audio mixers.

Mitch Gallagher at Sweetwater also has an excellent basic introduction to mixers.

--> How Mixers Work


Phantom Power

Condenser microphones require some type of voltage to polarize the capsule and/or amplify the small signal from the capsule and then convert the high impedance to a low impedance needed at the mixer. Some condensers have a pre-polarized capsule (electret), but these still require power for the other functions mentioned. Some microphones can use a battery to accomplish this, but most condensers require power from the mixer. This power is provided by a circuit like the following:

The power is called phantom power because mics which do not need it do not see it. The same positive voltage is applied to pins 2 and 3, so with a dynamic mic, whose coil is connected between these two pins, no current will flow through the coil. A condenser will use the voltage from one of these pins along with the negative or return path on pin 1 to power its circuits. Sometimes, a technician will sever the ground connection on one end of an XLR cable in an effort to reduce hum. A condenser mic will not work with such a cable.

Some mixers have one switch to turn on phantom power to all channels, but many, particularly digital mixers, have an individual switch on each channel. It is important to turn off phantom power to a channel when plugging in or removing the connecting cable to a mic. Otherwise a loud pop will occur that could damage the speakers. The the mic itself could be damaged, though not usually. Muting the channel should work also, but some devices, such as a digital recorder, may not have a mute switch.

The voltage and current required depends on the individual mic. SoundDevices.com has a an article on phantom power, with a sampling of condenser mics and their current draw. Most require 1 to 5 mA at 48 volts. Some require only 9 volts, but all will function with 48. Earthworks mics all require 10 mA. The phantom power circuit at the mixer has current limiting to protect the mics and the mixer, and the mic circuit will reduce the voltage to that needed by the mic.


Most active direct boxes require phantom power to work properly. Some older lavalier mics used a 1.5-volt battery in the cable to the mic, but new wireless lavs or headsets and some choir mics use the transmitter or battery pack to convert phantom power to the small voltage needed by the condenser mic. For example. the Shure BG 4.1 cardioid condenser mic could use a 1.5-volt battery as well as phantom power. This rugged mic is no longer made, being superseded by the PGA81, but can be found on the used mic market for about $50.

For more details, see this article by Bruce Bartlett at ProSoundWeb.com.

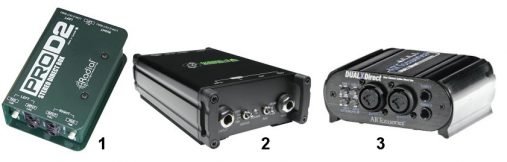
A Direct Box is a device used to connect an unbalanced high-impedance device such as a guitar or CD player to the low-impedance input of a recorder or mixer. This usually converts a quarter-inch plug into an XLR jack. The box may use be passive, using a transformer, or active, using an electronic circuit. The latter require phantom power from the mixer in most cases, but some can work with a 9-volt battery. The three example in the picture illustrate these:

1 - A Radial Pro D2 passive dual channel direct box.

2 - A Mackie MDB1A active single channel box that requires 48-volt phantom power.

3 - An ART dual channel active direct box that can use phantom power or a 9-volt battery.


Mixer Channel Strip

A Fader Strip on an Allen and Heath QU Digital mixer

Using an Audio Mixer

THE MIXER CHANNEL STRIP

A mixer may seem complicated at first, but each channel is like all the others, to a large degree, so once you understand the controls on one channel, you know their function on all channels. The picture to the left is a channel strip for a Behringer 24442, taken from the Mixacademy web site, which has a great introduction to using a mixer. This mixer has a partially parametric EQ section and a high-pass knob along with a compressor.

The lower picture shows the fader strip on a particular digital mixer. While it seems less functional, pressing the Select button connects that channel to the Preamp Gain control, a fully parametric 4-channel EQ with separate high-pass filter (13 control knobs) with a visual display, a compressor/limiter, and a gate control. In addition, the two Layer Select buttons can select one of three fader levels, meaning that the mixer actually has three times the number of physical channel faders!

CONNECT ALL INPUT DEVICES

Most mixer inputs are designed for balanced connections, either 3-pin XLR or quarter-inch TRS plugs. Some have one or more channels that can accept unbalanced RCA or eighth-inch (3.5 mm) phone plugs. You can also use an unbalanced quarter-inch plug in the balanced phone jack input jacks. Also plug in any outboard processors into the Insert jacks, if applicable.

USE A HIGH-PASS FILTER ON MOST INPUTS

A high-pass filter, also called a low-cut filter, removes the bass frequencies from all channels which do not generate these frequencies. This helps minimize noise from mic handling, plosives, and bass sound from other devices, such as drums, even hum. This helps the mix to be cleaner overall. Adjust the frequency to match the source. For example, with a female vocalist, the frequency can be set as high as 100 Hz, but for a baritone or bass singer, it should be closer to 40 or 50 Hz.

MAKE INITIAL CONTROL SETTINGS

The following steps are simplified general guidance, are somewhat dependent on the actual system configuration, and depend to a degree on whether the mixer controls are analog or digital. (1)
  1. Turn off the power amps. Activate the Mutes on all input channels.
  2. Turn the input gains on all channels down to zero.
  3. Set all faders, including the Main, to the 0 dB point. (2)
  4. Turn on phantom power, if needed, then unmute a selected channel, activate the input signal, and turn up the gain to the desired level (3).
  5. Use monitor speakers or headphones to adjust channel EQ as needed.
  6. Repeat these steps for all channels.
  7. Turn the Main faders all the way down
  8. Turn on the power amps and set the input level control to an appropriate level. (4)
  9. Turn the Main fader up to the desired level. Ideally, this should be around 0 dB, but it depends on the settings and capability of the power amps and speakers.
  10. Adjust the faders on each channel to achieve the desired mix.
  11. Set the routings for all Auxes and adjust their levels as needed
  12. Add in desired effects, including compression, and adjust these levels as needed. Adjust channel faders as needed.
  13. Use Solo or PFL buttons to listen to individual pre-fader signals to check for noise, distortion, and desired qualities.

Notes:

  1. These steps depend to a degree on the metering available on the mixer. There is a separate set of adjustments needed to tune the audio system to the room. Due to the complexity of this step, it is not covered here.
  2. The Main fader is set to 0 dB so that the output level can be seen on its output meter. On some analog mixers, this is the only actual meter available. Others can use the PFL button to help set levels. On a digital mixer, each channel typically has its own level meter measuring the input prior to the fader.
  3. The optimum Gain setting depends somewhat on whether the mixer is analog or digital. On an analog mixer, set the Gain so that the signal seldom activates the peak indicator or turns the level indicator red. On a digital mixer, the signal should never peak. On an analog mixer, you usually want as much gain as possible. On a digital mixer, this is not quite as important, and the level is typically set to -15 dB to -18 dB on the input meter.
  4. The level control setting on the amp depends on its power capability relative to speaker efficiency and the sound level desired for the venue. This calls for some judgement on the part of the operator.


To see some examples of actual small to medium-size mixers, go to the Mixer Types page.

Verified by MonsterInsights